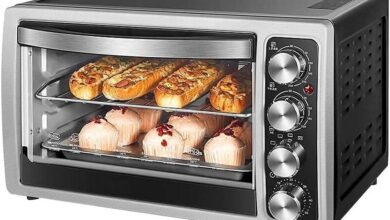
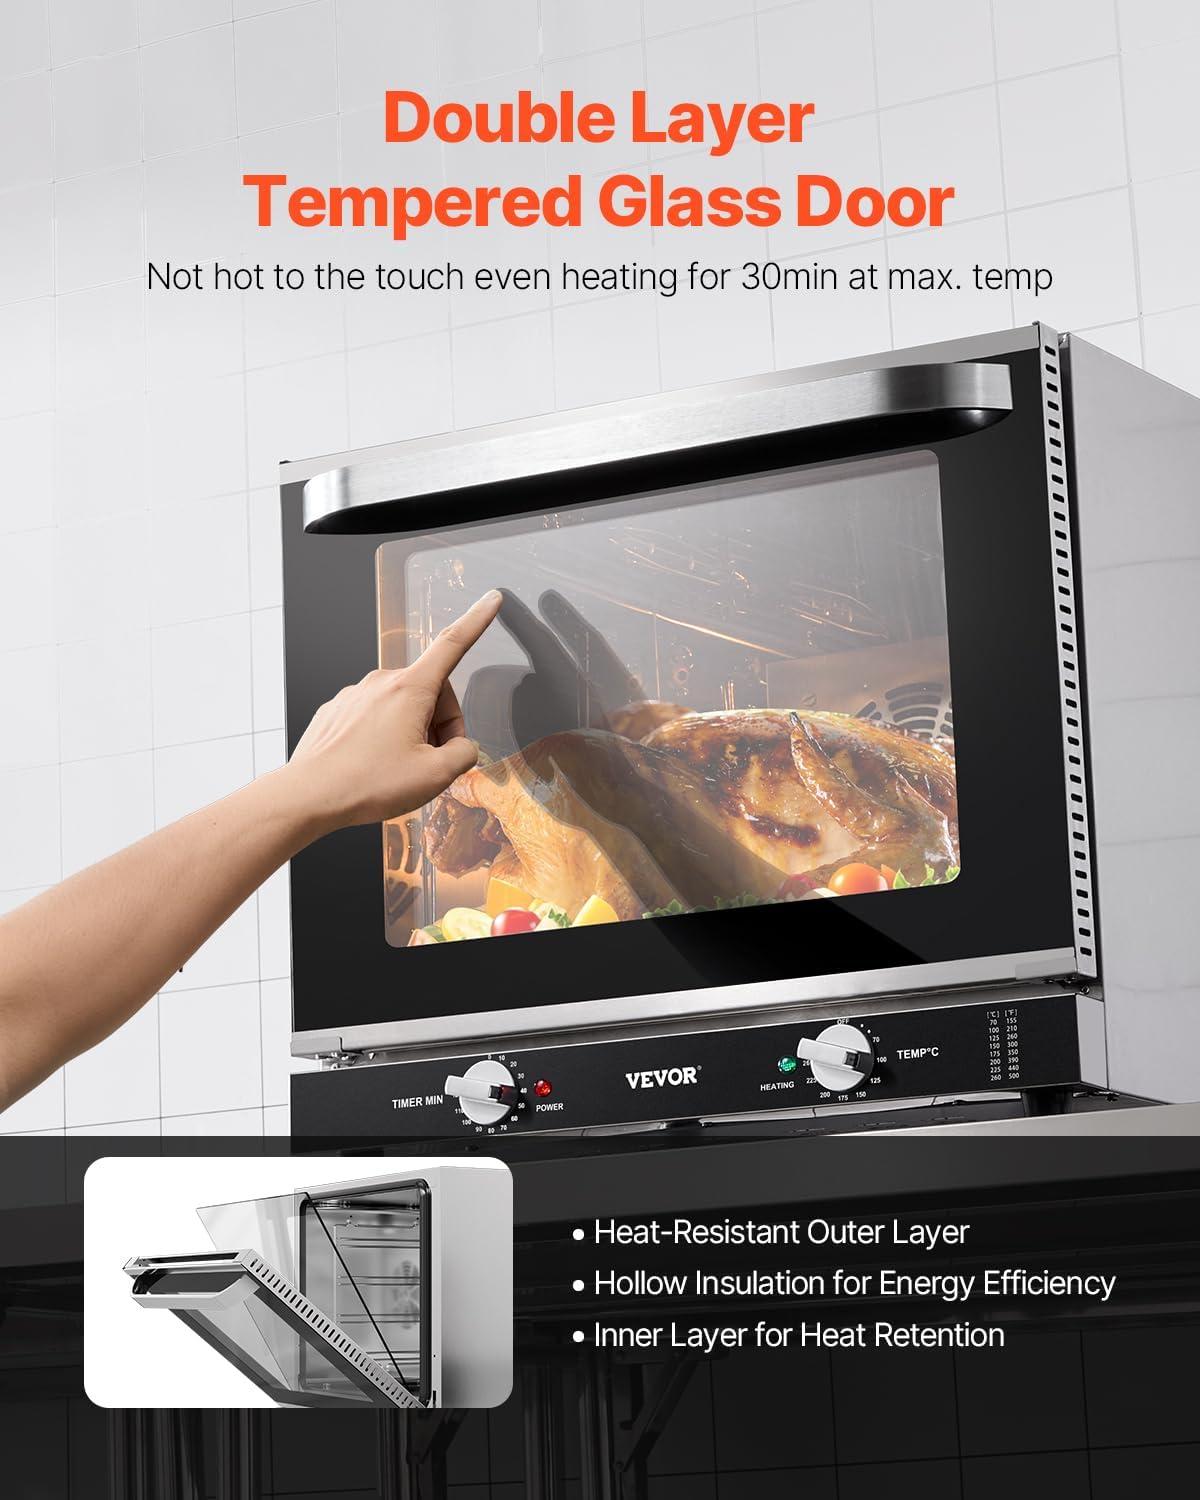
You notice the weight first — sliding the stainless shell into view leaves a cool, slightly textured feel under your palm and makes the piece register as something solid. the VEVOR Commercial Countertop Oven, 66L 4-Tier Toaster Oven shows itself as a block of brushed metal with a thick tempered-glass door; when you open it the hinge is firm and the glass gives a muted ping if you tap it.Racks cluck as they slide in, seams and welds catch the light, and the handle has a practical, no-frills heft to it. Turn it on and a steady hum fills the space while the interior lamp throws a bright, clinical wash across the trays — small, immediate cues that shape your first impression before anything ever goes in to bake.
What you notice the first time it sits on your counter during a busy shift
When it first lands on your counter in the middle of service, the thing almost demands a moment of rearranging — you shift utensils, scoot a prep tray, maybe pull the cart forward by a few inches so the back vent has room. From across the line you notice the stainless surface catching the lights and fingerprints in a way that makes you reach for a towel between batches; the glass door gives you a speedy visual on trays without swinging open the unit, so you find yourself checking it more frequently enough than opening it. There’s an audible presence too: a steady fan hum that becomes background to the clatter of pans, and the occasional click as the thermostat cycles. as you work you become aware of small,practical details — the cord needs a clear path,the door handle’s temperature alters how you grab it mid-rush,and steam escaping from the rear creates a warm halo that nudges where you place hot pans or towels.
- sight: the large window and mirror-finish surround make monitoring food quick, but also show smudges and grease in real time.
- Sound: constant low fan noise with intermittent mechanical clicks; sometimes you catch a light rattle if a rack isn’t seated the same way.
- Touch: the exterior warms up into a usable hot zone — you instinctively leave a bit more clearance when plating nearby.
In practice you adapt your motion patterns around it: you pull it toward the edge when you need to load and push it back out of the way between waves, and you wipe the front during short lulls so the next glance isn’t smeared. The door’s visibility changes how often you open it — a quick peek saves time, though opening still pulls a noticeable rush of heat outward and you sometimes pause to let the steam clear before reaching in.Small maintenance habits reveal themselves quickly too; a stray drip or crumb on the oven lip gets attention during the shift rather than later, and you tend to reposition small tools that would otherwise sit in the unit’s warm footprint. Occasionally you make a tiny, on-the-fly tweak — angling a tray differently, nudging a rack — actions that become part of the routine once the oven is part of the line.
The stainless steel case and tempered glass door up close,the seams,weight and finish under your hand
You run your fingers along the stainless steel skin and get a clear sense of how the exterior was finished: it leans toward a brushed/satin feel rather than a high mirror polish,so smudges register but not in a way that blinds you. at panel joins the seams are mostly even; if you follow a corner with a fingertip you can feel where a weld was filed down and where the metal was dressed, a faint transition rather than an abrupt lip. The door’s face is visibly layered—tempered glass with a narrow visible gap to the inner pane—and the rubber gasket around the frame compresses softly when you press, creating a small give at the edge.Small, practical touch points you’ll notice during routine handling:
- Handle: cool to the touch, weighted so the door doesn’t feel flimsy when you grip it.
- Door edge: a soft gasket line that cushions contact and hides the seam between glass and frame.
- Corner seams: faint ridges from welding that are perceptible if you trace them with a fingernail.
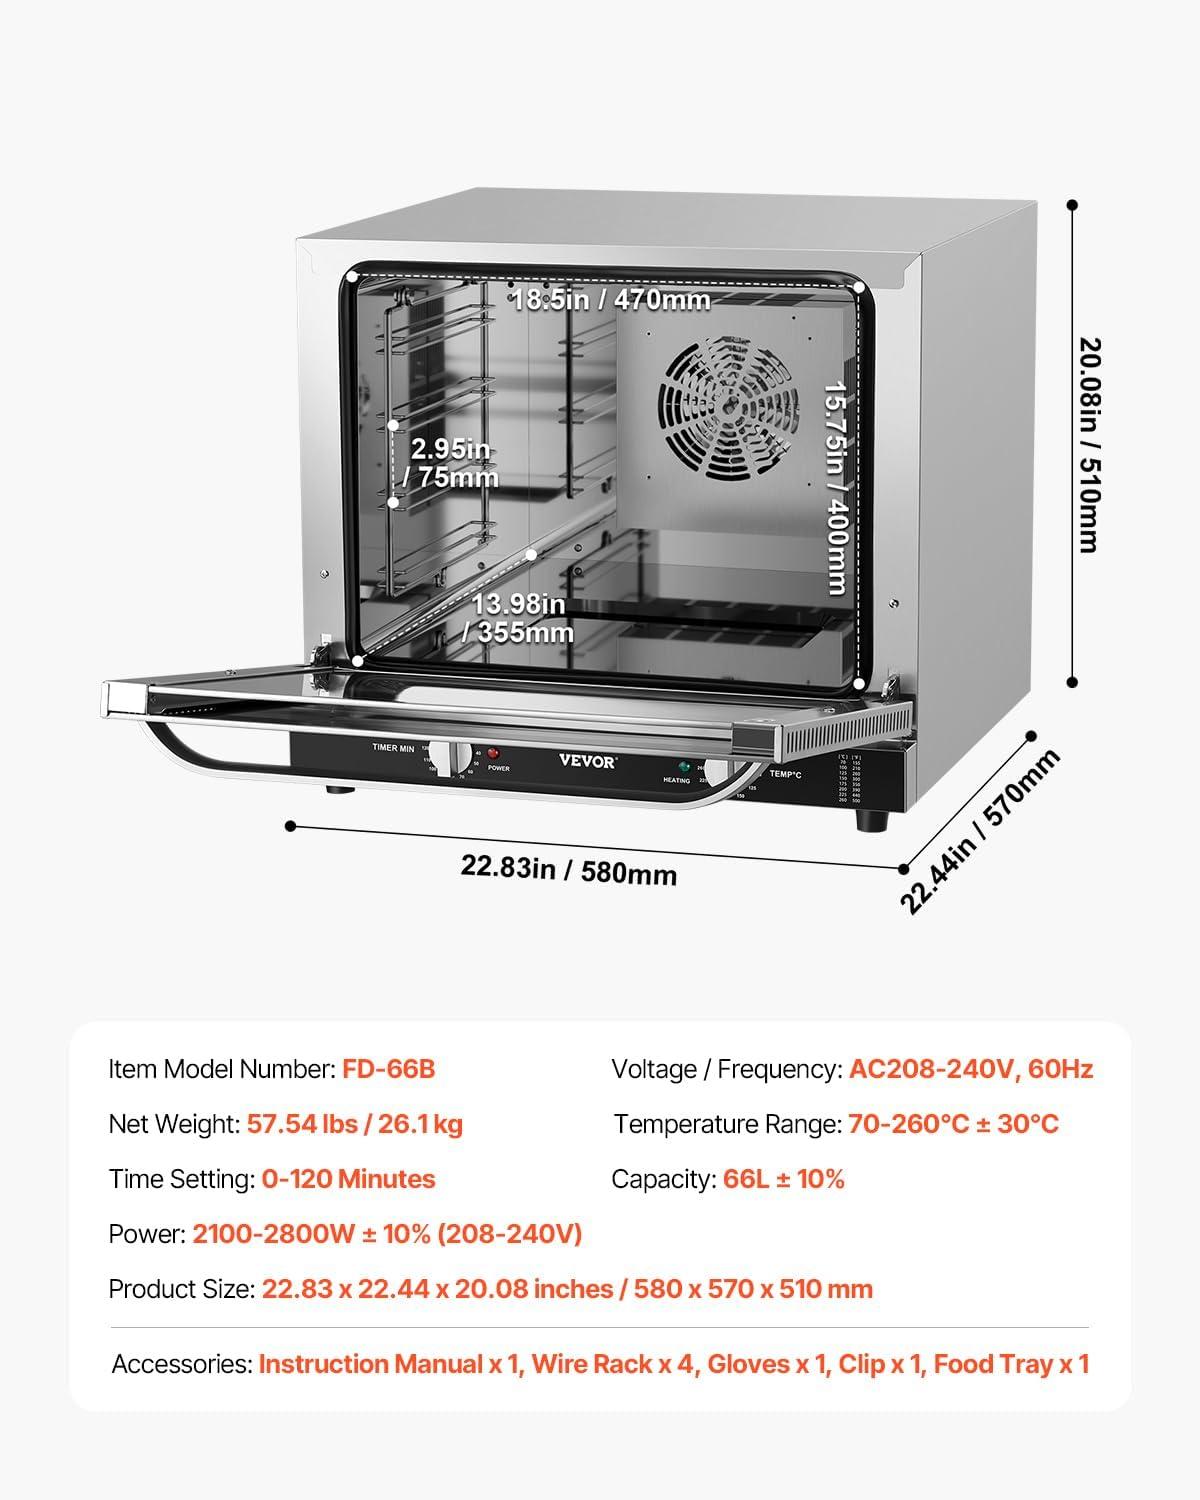
When you open and close the door the weight and balance become obvious: the glass adds depth so the door swings with a solid,measured feel and the hinge offers steady resistance rather than a loose flop. moving the unit by hand, you feel the overall heft shift toward the base; lifting it a short distance usually calls for a two-handed grip to keep it steady rather than to actually test load limits.Along the back and side panels you can spot slim seams where panels abut and along vents there are tiny gaps that are visible more than they are rough to the touch. The table below summarizes a few seam and finish impressions you’re likely to register on first contact, presented as descriptive notes rather than specs.
| Location | Surface touch | What you feel |
|---|---|---|
| Front door frame | Bordered by rubber gasket | Soft compression; glass sits slightly recessed from frame |
| Top and side seams | Ground, brushed finish | Mostly smooth with faint weld line at corners |
| rear panel / vent joins | Panel butt joints visible | Narrow gaps visible; edges feel flush but not seamless |
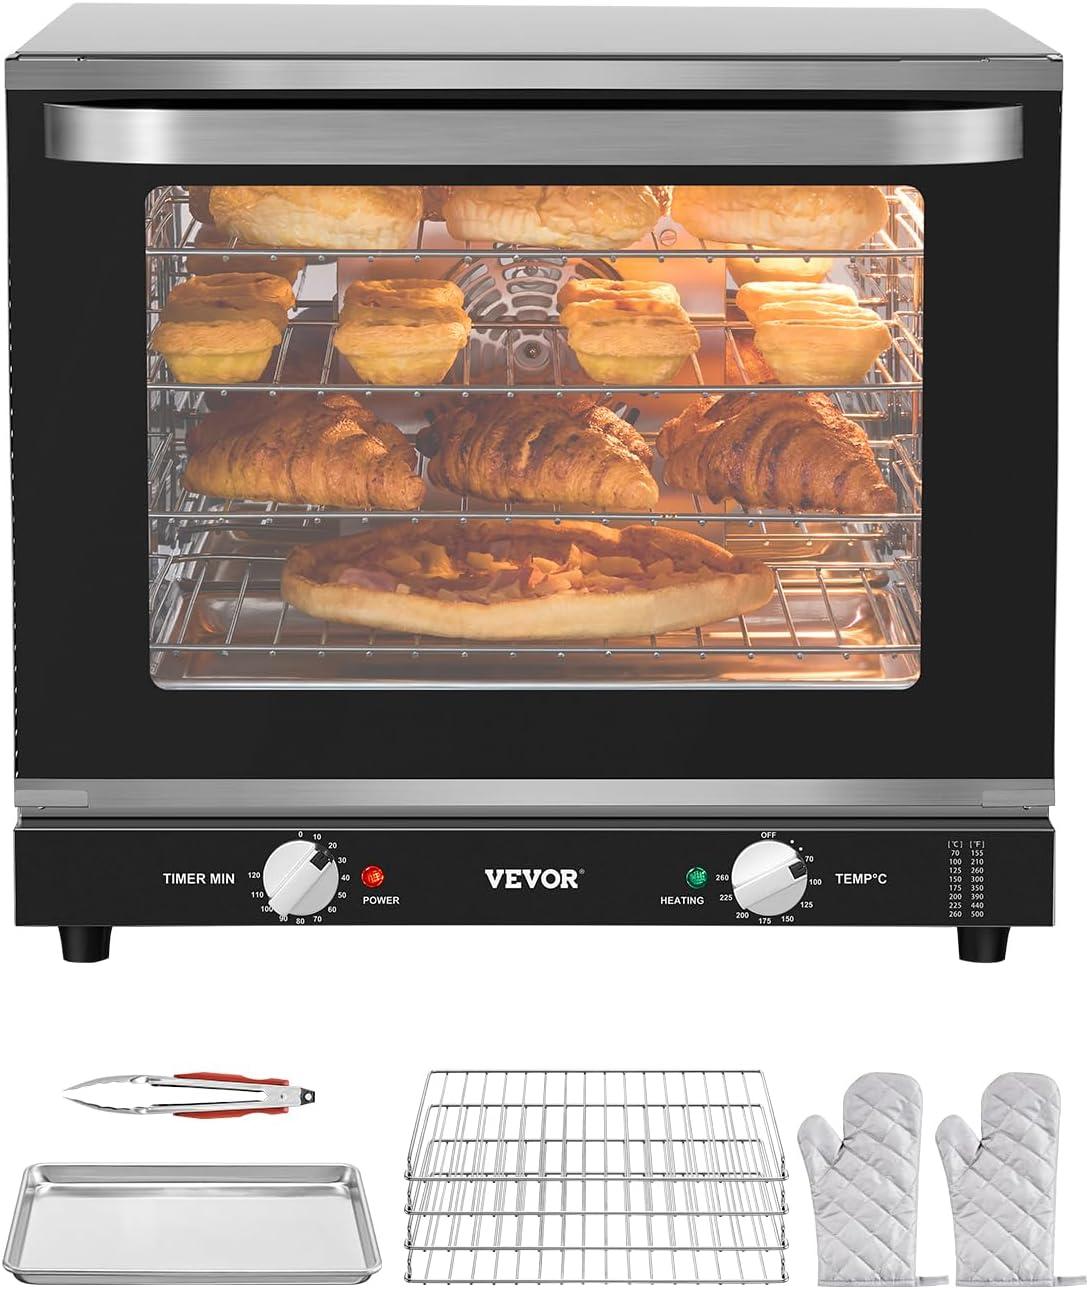
How you operate it — knobs, rack clips, sliding trays and the feel of the included gloves
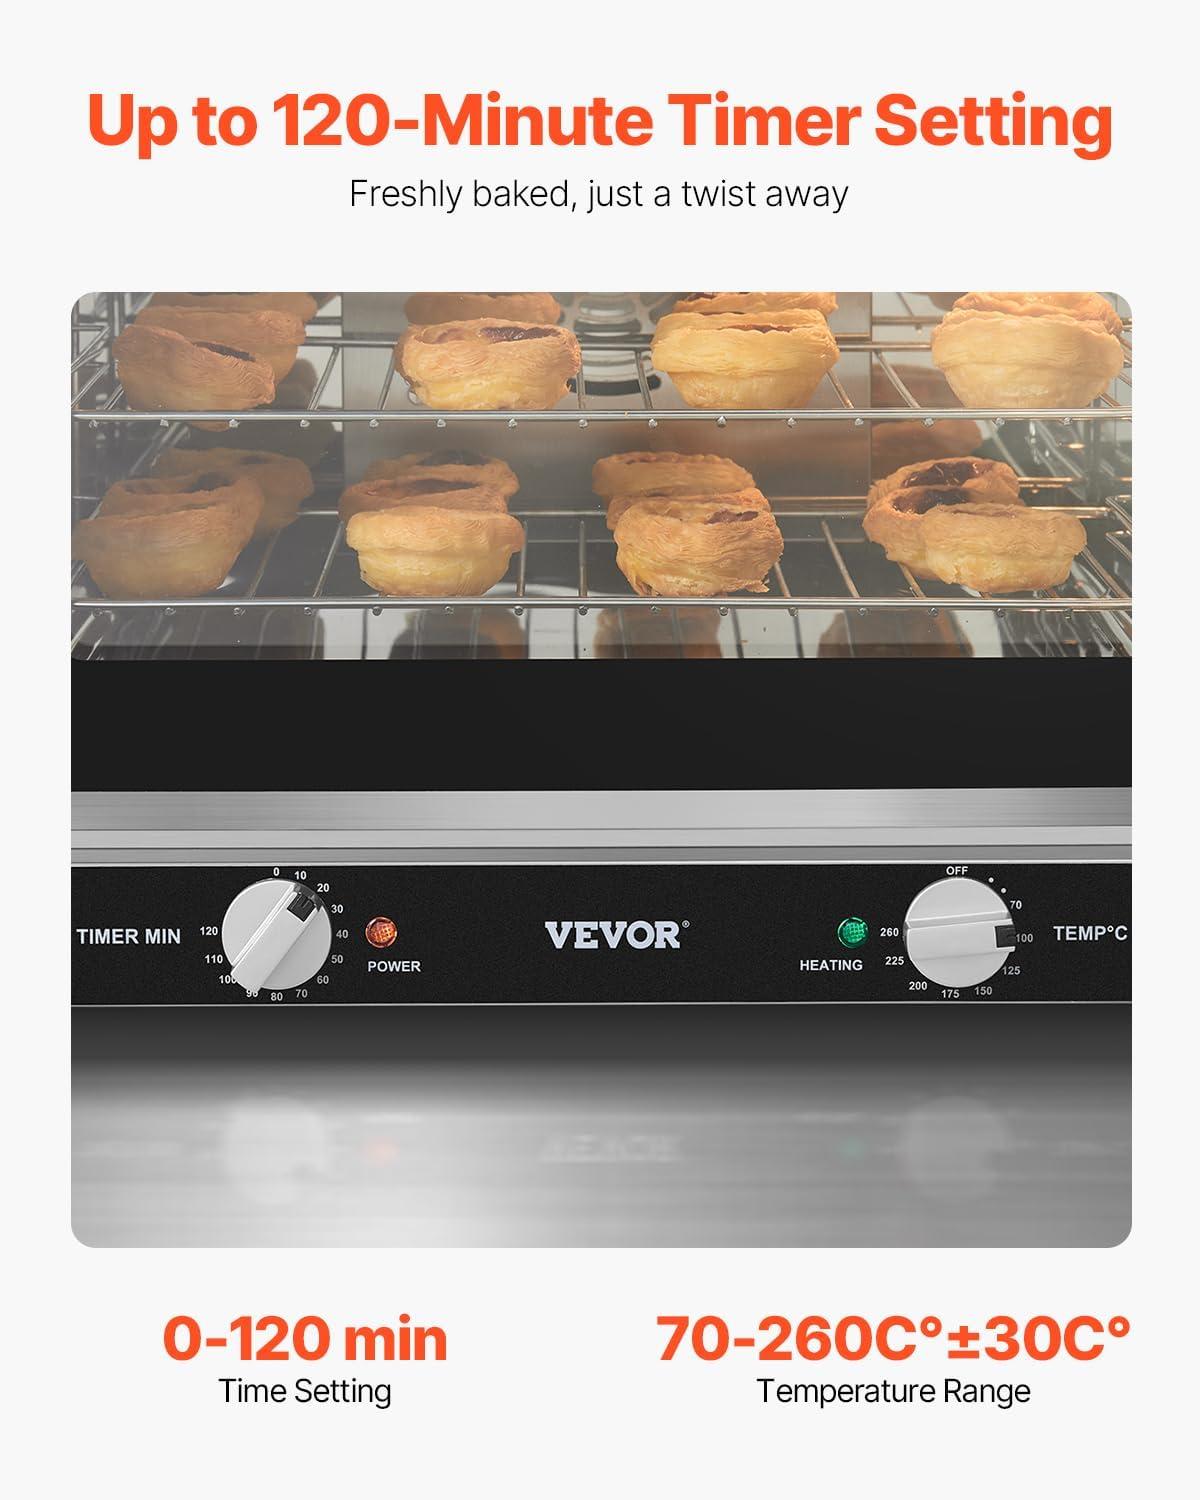
When you reach for the controls,the two front dials are the first tactile interface.They turn smoothly with a modest, steady resistance rather than sharp clicks; the temperature dial is marked in degrees (you’ll notice the main scale is in Celsius) and the timer has a soft spring-stop so it doesn’t slam past the setting if your hand slips. In everyday use you find yourself nudging the temperature slightly while the oven warms up, and the low-profile knobs sit close to the face so they’re easy to wipe free of flour or crumbs after a busy run.
- Temperature: rotary dial with continuous travel and small tick marks, set by eye more than by precise detents.
- Timer: spring-backed dial that returns to zero when finished and can be reset with a gentle turn.
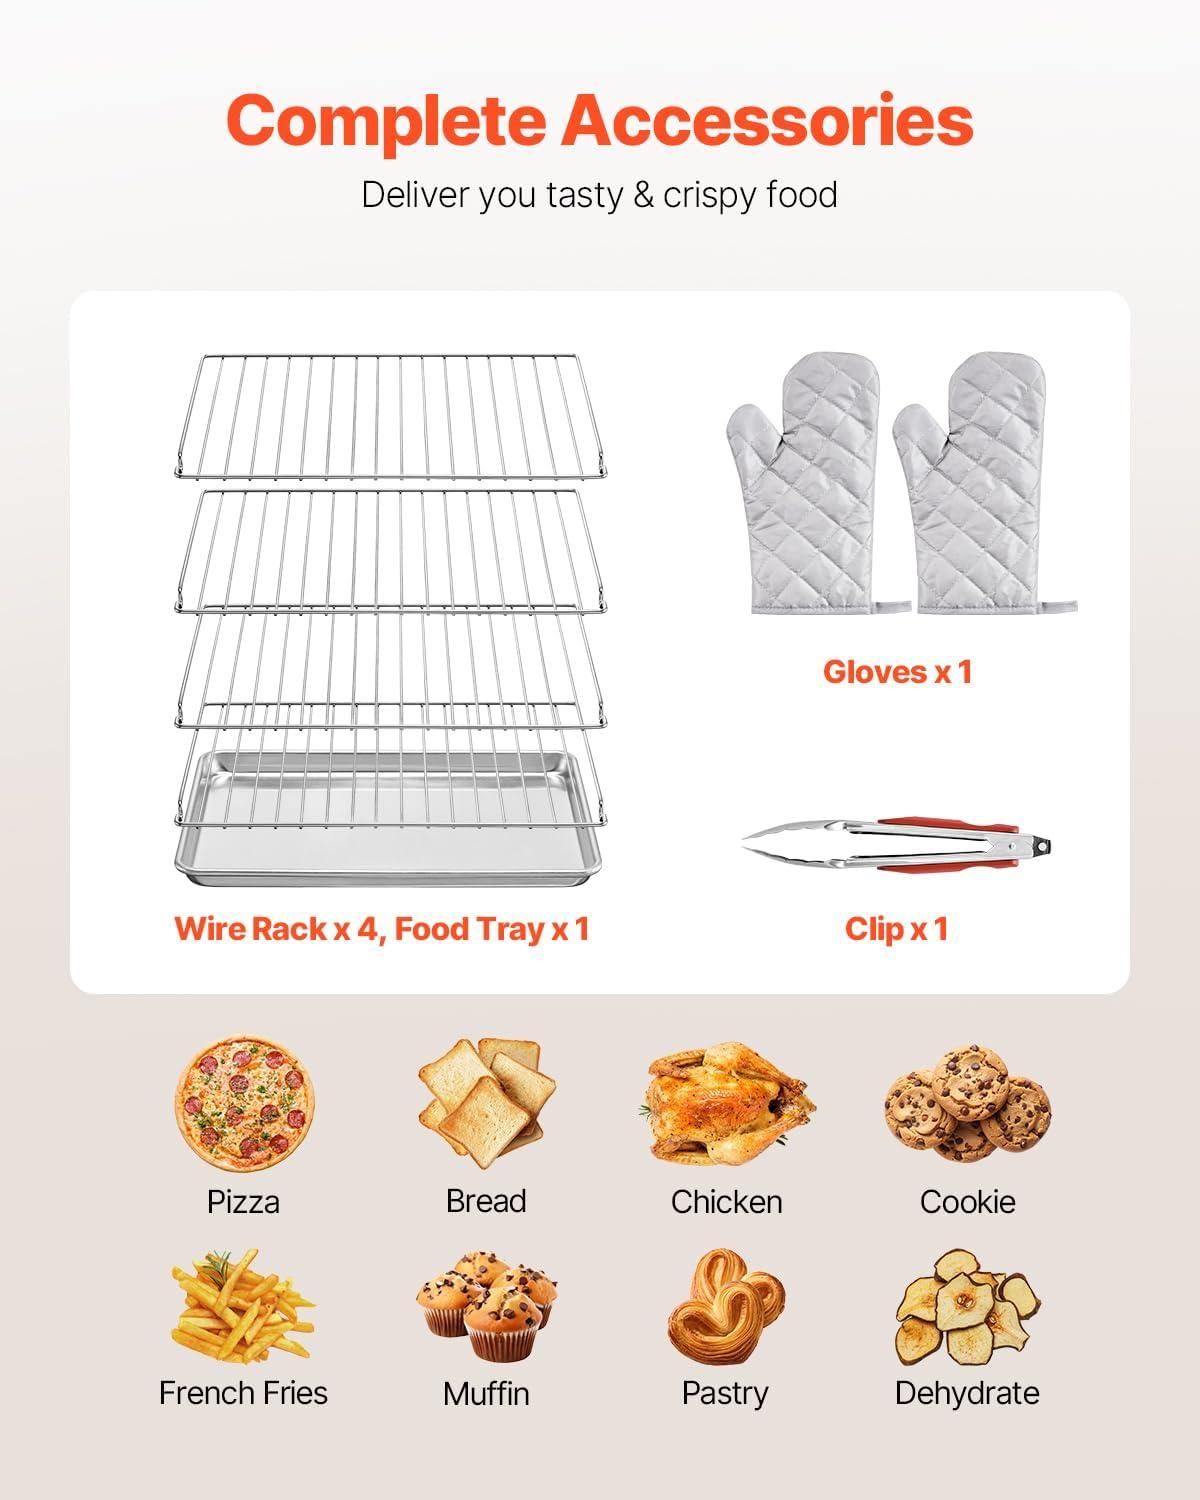
Inside, the wire racks engage with simple clip points and slide into horizontal grooves; to seat a rack you often angle it slightly and give a little shimmy so the clips catch, and when loaded you’ll tend to use both hands to pull a tray out so it doesn’t tilt. The single clip accessory is a springy metal grab that bites the rack edge—useful for lifting a hot tray a few inches but not really a full substitute for a proper tray lifter. The included gloves feel flexible rather than bulky: a fabric-backed,heat-resistant material with a textured surface that helps grip pans and handles.They allow decent finger movement for quick tugs and adjusting pans, and you’ll typically toss them on the counter to air out or into the laundry when they collect crumbs or grease as part of normal upkeep.
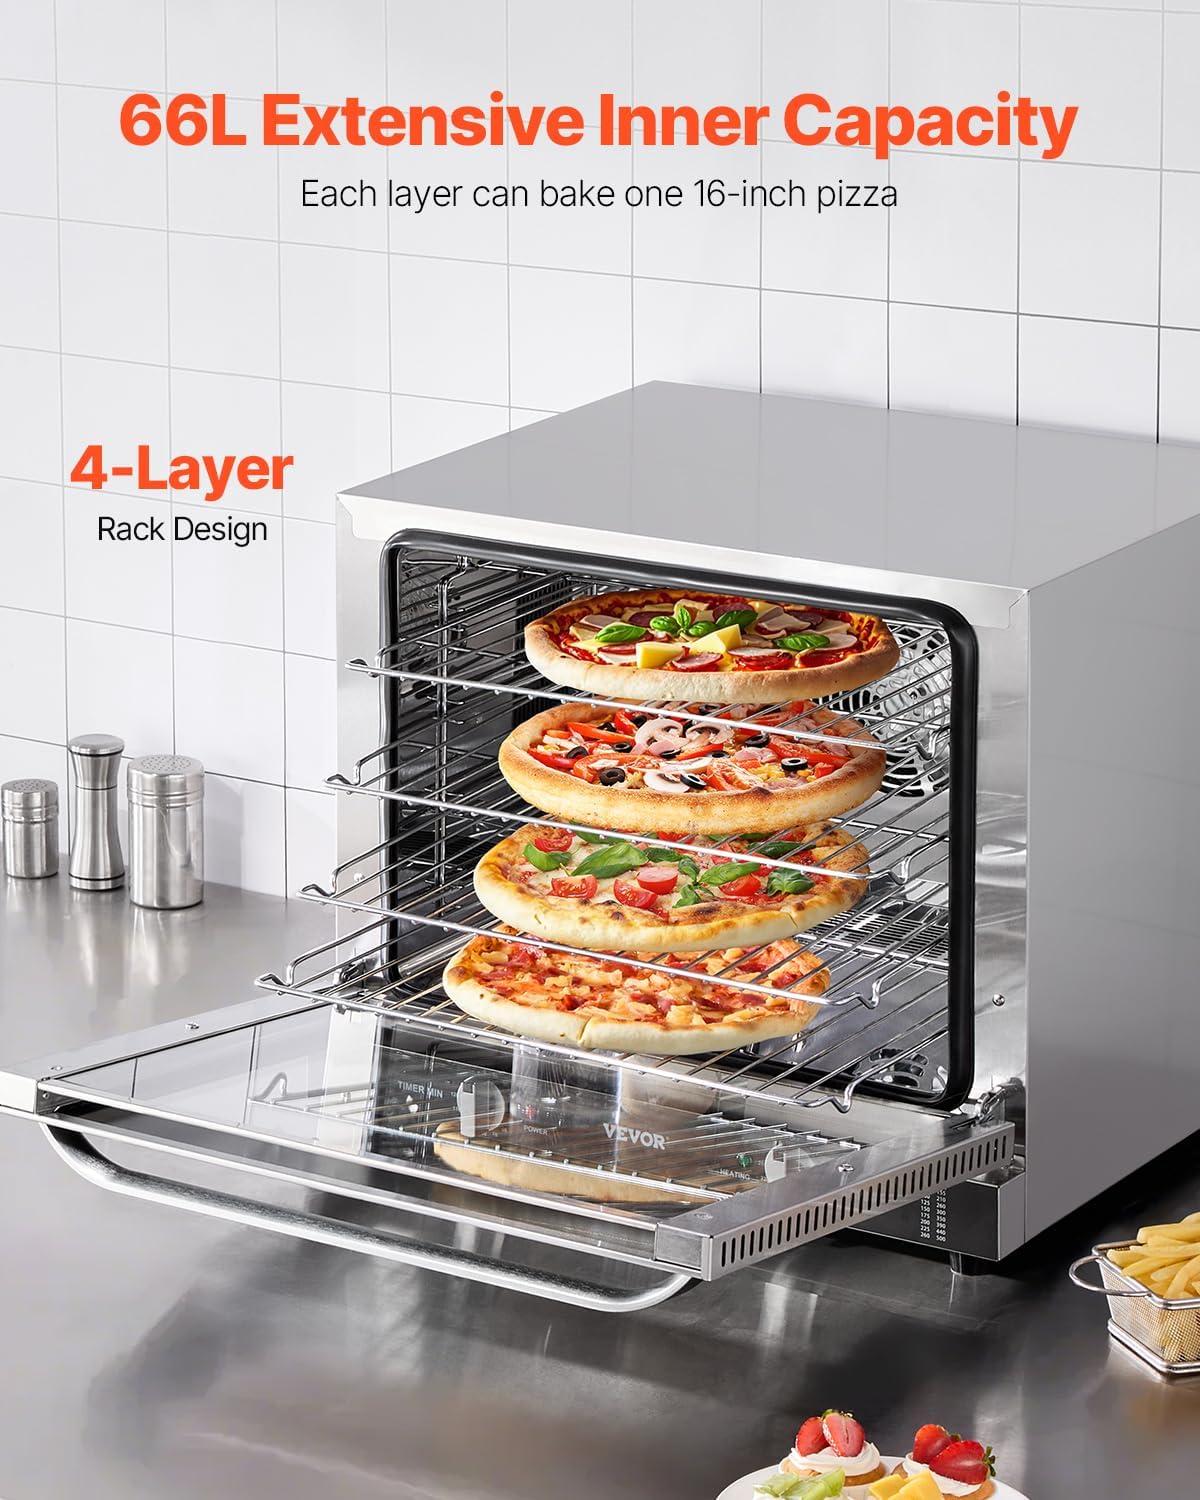
Finding a home for four tiers,from footprint and clearance to how it reshapes your prep layout
Footprint and clearance become everyday considerations the moment you bring the oven into the kitchen. The unit occupies a noticeable vertical presence on a counter, so you’ll find yourself checking not just the width and depth but whether the surface can support frequent load-bearing and the habit of sliding it forward for access. Leave room behind for the power connector and the venting path — usually a couple of inches is enough in most countertop setups — and allow some space above and in front so the door swings freely and you can reach the upper racks without awkward stretching. A quick checklist you’ll likely run through when settling the oven:
- Power access — is the outlet reachable without stretching or using adapters?
- Work surface stability — can the counter take the repeated movement of racks and trays?
- Access clearance — can you open the door and remove trays comfortably?
| Place to check | Why it matters |
|---|---|
| Back area | space for cord, slight venting clearance and to avoid heat against a wall |
| Top and front | Room to open door, reach upper racks and stage trays when unloading |
Routine upkeep becomes part of keeping that area usable — you’ll probably pull the oven forward now and then to wipe crumbs and clear steam residue, rather than treating cleaning as an occasional chore.
Once it’s in place, the four-tier layout subtly nudges how you arrange prep tasks and traffic on the counter. Rather of juggling single pans, you tend to think in batches: staging multiple sheet pans nearby, moving a cutter board or cooling rack to a neighboring shelf, or using a small cart to ferry trays between bench and oven. That changes small habits — you might preload trays the night before, clear a standing area for hot pans, or keep tongs and gloves in a dedicated drawer within arm’s reach — and it can shift where you keep frequently used tools so they don’t obstruct rack access. In practice this means your countertop may feel more zoned (loading, cooling, finishing), and you’ll find yourself making tiny layout compromises — pushing a mixer a few inches or shifting herbs and prep bowls — to keep the flow smooth when four trays come out at once.
how it stands up to the realities of restaurant service and where expectations meet limits
In day‑to‑day service, the oven behaves like a workhorse with caveats. During back‑to‑back runs it accepts multiple pans on the racks and the large viewing window lets staff check progress without opening the door; at the same time, the exterior warms noticeably and the internal temperature can show regional variation, so rotation of trays or moving pans between shelves is a common, ad‑hoc workaround.Routine interactions reveal a mix of steady performance and intermittent issues: some units hold steady temps for long bakes, while others show lower-than-dial readings or develop uneven cooking after weeks of heavy use. Noise and mechanical sounds are mostly background hum from the fan, though there are repeated reports of sudden bangs or fan failures that coincide with service interruptions, and a handful of units have arrived or failed with shattered front glass—details that tend to shape how a kitchen schedules backups and spare parts.
Maintenance and placement become part of the daily choreography around this oven. Staff often pull the unit forward to clear the vent and wipe splatters from the stainless finish between shifts; the mirrored surfaces show grease build-up more quickly than matte steel, and racks can feel loose over time so quick readjustments are common.Electrical and installation quirks have practical consequences too: some installations require a specific outlet configuration,which can delay commissioning untill an electrician is available. the picture that emerges in service is of an appliance that can shoulder a busy rhythm but also creates predictable points of friction — heat migration, intermittent calibration drift, occasional mechanical failures — that affect uptime and routine workflow.
| Service scenario | Observed behavior |
|---|---|
| Continuous batch baking | Handles multiple trays but frequently enough needs tray rotation for even results |
| High‑frequency opening/closing | Exterior gets hot; temp recovery can drop noticeably |
View full specifications and listing details
The small chores you do after service, the cooling, wiping and routine maintenance you’ll notice over time

After a service rush you’ll notice a short lull where the oven becomes part of the cleanup rhythm rather than the cooking rhythm. You tend to leave it closed to cool for a bit, then — when it’s safe to touch — pull out the racks and trays with the supplied gloves or a towel, shake off crumbs and greasy drips, and wipe the interior surfaces. The tempered glass usually fogs or streaks from steam; a quick swipe once things have cooled will restore visibility for the next run. The stainless exterior collects fingerprints and splatters in a way that makes it obvious if it hasn’t been wiped between shifts; in most cases a damp cloth and a light polish cut through the daily grime, though stubborn baked-on spots can linger until you have time for a deeper clean.
Over weeks and months the minor chores settle into a predictable pattern: more frequent crumb-emptying after heavy baking days, occasional re-seating of racks that get nudged out of alignment, and a periodic look at the door seal and hinges for trapped debris or condensation. You’ll notice vents and the area around the rear outlet attract flour and dust in busy kitchens, and every so often you’ll spend extra time on any discolored seams or stubborn residue that doesn’t come off with a routine wipe. Below are the maintenance rhythms that tend to emerge in normal use — simple observations of what you’ll likely do, not instructions:
- Daily/after service: quick interior wipe, empty crumb collection, exterior wipe-down
- Weekly: remove racks/trays for a more thorough clean and check for alignment
- Monthly or as needed: inspect seals, hinges and vents; address baked-on deposits
| Routine task | Typical cadence you’ll find |
|---|---|
| Crumb/tray clearing | Daily or after busy shifts |
| Glass and stainless wipe | Daily to weekly, depending on visible residue |
| Seal/hinge/vent inspection | Monthly or when you notice performance changes |
Its Place in Daily Routines
After living with it for a while, the VEVOR Commercial Countertop Oven, 66L 4-Tier Toaster Ovens with Tempered Glass Door, Wire Racks Clip Tray Gloves, 2800W Electric Stainless Steel Baking Ovens for Restaurant Bakery (AC208~240V,60Hz) settles into the background of the kitchen, its outline a familiar mark on the counter. Plates, racks and the occasional smudge on stainless steel tell small stories of regular use — morning reheats, midshift baking, the habit of sliding mitts onto hands before lifting a tray. It nudges how space is organized and shapes quick motions in everyday rhythms, while surface marks and tiny scuffs quietly register the passage of routine.Now it stays, quiet and present, settling into routine.
As an Amazon Associate I earn from qualifying purchases. Amazon and the Amazon logo are trademarks of Amazon.com, Inc, or its affiliates. All images belong to Amazon