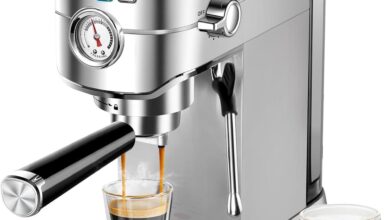
You slide the roaster into place and instantly notice the weight—it’s a grounded presence, not something that breathes light into the room. The 304 stainless shell feels cool and faintly textured under your palm, seams and welds showing where function was given form. A low mechanical thrum from the four motors settles in as you reach for the sampler spoon; the sight glass catches the overhead light and makes the drum seem busier than its boxy silhouette suggests.Your first tap on the control panel registers with a tidy, tactile click, and a small metal plate by the controls quietly names the unit as GastroRoast 1K. In the moments you’re getting familiar, the machine reads as practical and purposeful—its footprint, finishes, and subtle noises all speak before any roast does.
How it looks on your counter the first time you pull it from the box
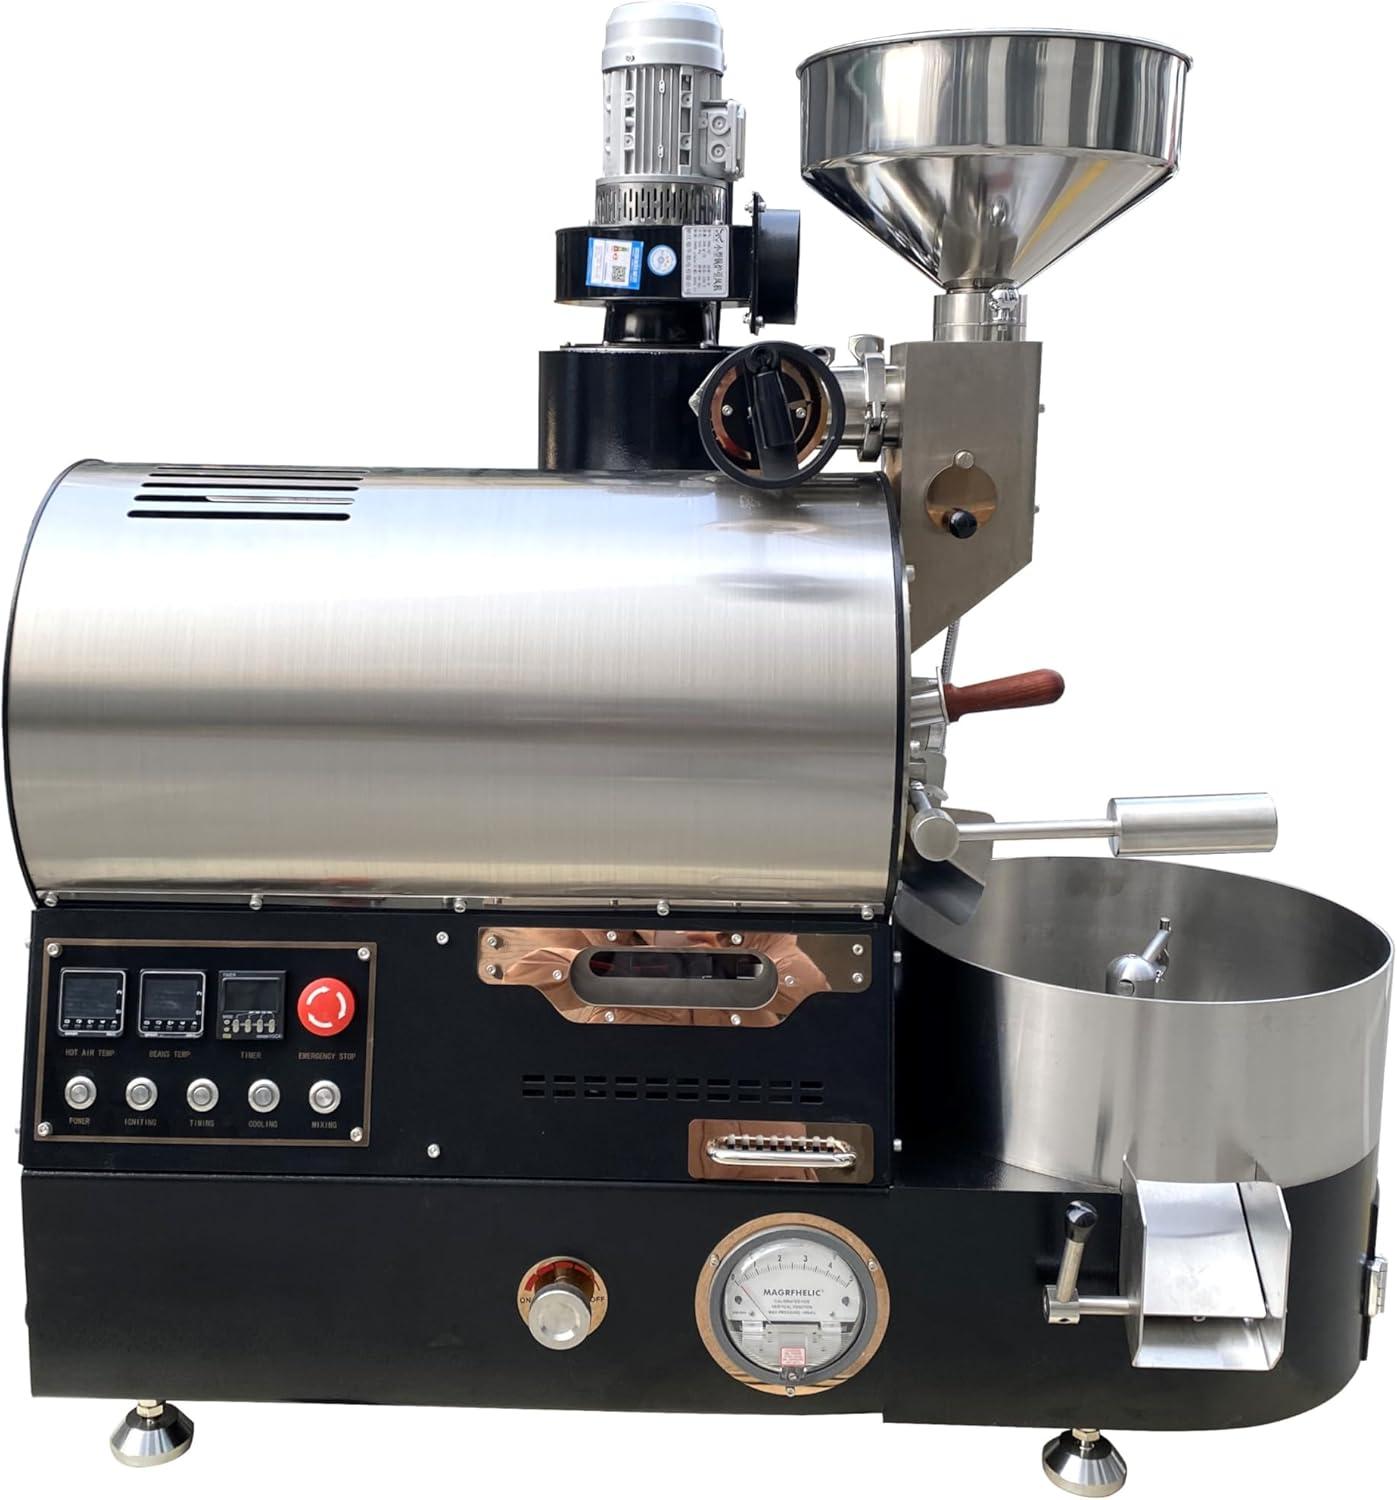
When you slide it out of the plywood crate and set it on your counter, the first thing you notice is the stainless-steel shell catching the light — not mirror shining, but finished enough that fingerprints show up after you adjust its position. The drum sits forward in the housing with a round sight glass and a burner window glass clearly visible on the front; the real-time temperature displays and a row of knobs sit above them, so the control face is the most immediate point of contact. Vents and an electrical lead peek from the back, and a shallow cooling tray nestles at one side; you tend to lean in, wipe a small shipping smudge from the drum, and read the labels on the access panels before you move it again. There’s a sense that it occupies a purposeful amount of counter space,so you naturally reposition cups or a small tray nearby to make room.
Included in the box:
- Sampler spoon and basic accessories visible either in a little cardboard slot or taped to the top.
- Sight glass and burner window already fitted into the front panel.
- Cooling tray and mixing arm attached or packed beside the main unit.
| Item | Where you’ll usually find it when unpacking |
|---|---|
| Main unit (stainless drum housing) | Centered in the plywood crate, wrapped in foam |
| Sampler spoon | Tucked into a small cutout or taped to the lid |
| Cooling tray / mixing arm | Side compartment or strapped to the base |
| Control/display panel | Pre-installed on the front, visible immediately |
the stainless drum, lids and fittings you’ll touch and inspect up close

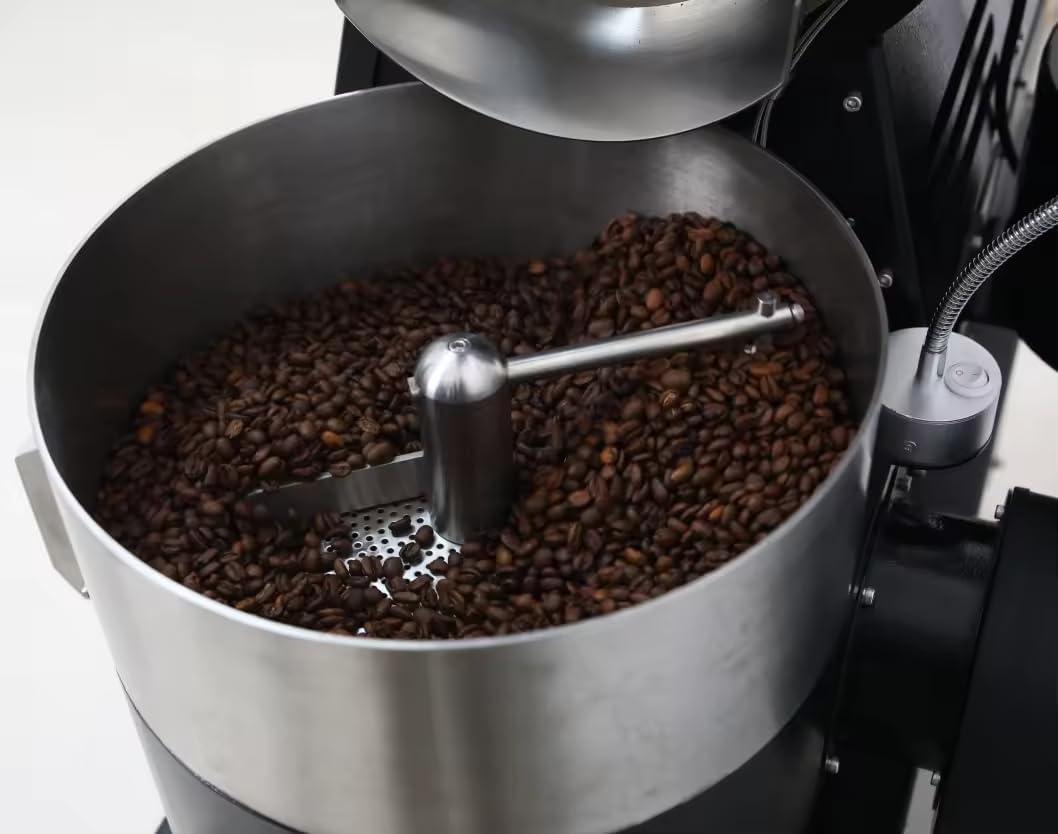
When you lift the lid and peer into the barrel, the drum’s stainless surface is immediate — cool to the touch when idle, with a brushed sheen that tends to show fingerprints and a light roasting oil film after a few cycles. The drum is stamped as 304 stainless, and you’ll notice the weld lines and seams where panels meet; those are places your fingers naturally trace while checking fit.The lid hinge and any thumb screws feel solid under hand, not fussy, and the sight glass and burner window glass sit flush enough that you can angle in close to observe flames or beans without shifting the whole assembly. A small sampler spoon hangs on its clip or pocket near the front; you’ll reach for it the way you do a kitchen spoon — quick, habitual, and occasionally with a stray roast chip clinging to the bowl.
Routine inspections tend to focus on a handful of touchpoints: lid seals, rim edges, fasteners, and the sight glass where residues collect. You’ll run your thumb along the drum lip to check for burrs,tap the sight glass to confirm it’s seated,and feel for any give in the lid gasket area after a roast. Everyday upkeep shows itself here too — light wiping removes most marks, while chaff and oil can pool along seams if you don’t nudge them free. Typical components you’ll encounter include:
- Drum interior — smooth panels with occasional machining marks you can feel if you press a fingertip to the surface;
- Sampler spoon — small, easy to misplace unless clipped into its bracket;
- Sight and burner windows — clear panes that collect tiny splatters and need a quick wipe;
- Thumb screws and clamps — straightforward to operate by hand, often where you’ll verify tightness before starting a roast.
| Component | What you check by touch or sight |
|---|---|
| Drum rim | Evenness, rounded edges, traces of chaff |
| Lid hinge / latch | Smooth movement, any looseness or play |
| Sight glass | Seating, clarity, light residue |
| Sampler spoon clip | Retention security and accessibility |
What you feel and hear while roasting: the controls, the turn of the drum and the soundscape
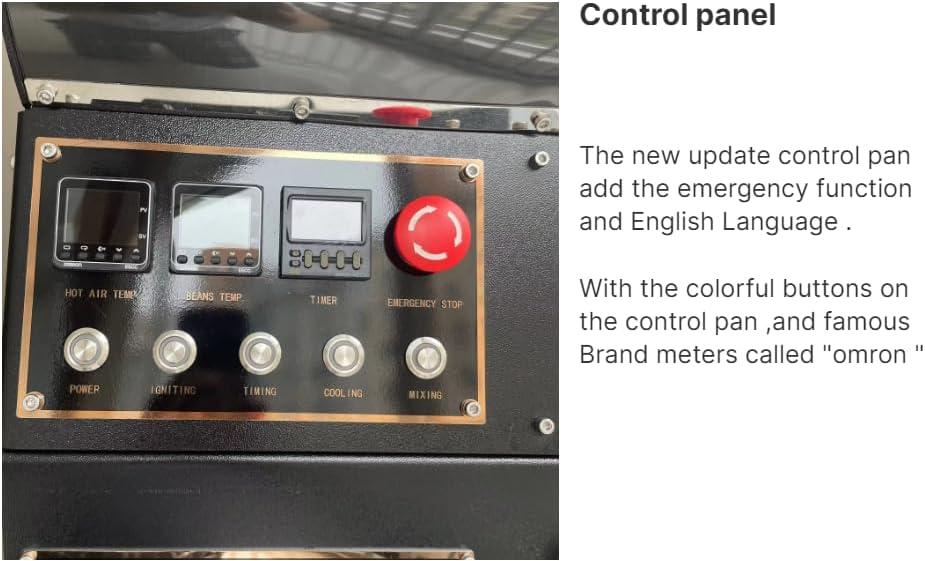
When you stand at the machine and begin a roast, much of what you register first is tactile. The control knobs and switches offer small, deliberate resistance so you can make incremental adjustments without fussing; a quick twist changes airflow or flame in a way you can feel through the fingertip. Sliding the sampler spoon into the drum or through the burner window produces a brief, warm snap against your hand and a tiny change in the vibration you sense through the housing. The drum’s rotation itself is a steady, almost hypnotic motion you sense more than see: a low, rhythmic thrum underfoot and slight, regular pulses against the frame. Buttons for the real-time displays click distinctly when pressed; the cooling tray and mixing control engage with a different, softer feedback when you flip them on. Small habitual actions crop up — you pause to re-centre a scoop, you rest a hand on the stainless surface to steady yourself — the machine becomes a set of discrete tactile cues you learn to read in mid-roast.
- Control knobs: defined detents, incremental feel
- Sampler insertion: quick thermal feedback, slight vibration change
- Drum turn: steady thrum transmitted through the casing
The soundscape shifts as the roast progresses. Initially there’s a steady fan whir and a low motor hum; as heat and airflow increase the noise takes on a higher-pitched hiss and a faint metallic resonance from the rotating drum. You’ll notice discrete,percussive sounds — the soft crackle of chaff,the sharper pops of first crack,and later,a faster succession if second crack occurs — layered over the machine’s mechanical bassline. Relays and thermostats add occasional clicks; displays emit short electronic beeps when you toggle settings. During cooling the mix motor and tray dominate, a more turbulent rush that drowns the finer crackle of debris. The overall acoustic picture is dynamic: sources combine and recede, creating a small, workaday orchestra where a single twist or tap can subtly change the timbre you hear.
| Sound source | Typical description | When it changes |
|---|---|---|
| Hot air fan | steady whir/hiss | as airflow is increased |
| Drum motor | low rhythmic thrum | constant during rotation |
| Burner | soft whoosh/click | when flame adjusts |
| Chaff/beans | rustle, crackles, pops | during first/second crack |
A morning’s routine with a 1 kg batch and how it slips into your coffee workflow
When you start a morning roast with a one-kilogram load, the ritual settles into a few familiar movements: weighing the green beans, sliding the drum door, and letting the machine come up to temperature while you set out filters and scales. As it hums, you find yourself checking the sight glass and the real-time temperature readout more out of habit than necessity, and the sampler spoon makes a quick appearance mid-cycle so you can assess advancement with a small pinch. the motors’ subtle changes in pitch and the occasional nudge of the airflow dial become part of how you read progress; sometimes you pause to tweak drum speed, sometimes you just watch the color through the glass. Cleaning and upkeep show up as small, habitual tasks — you clear the chaff collector and give the cooling tray a quick swipe while the beans finish, not as a formal chore but as part of winding the morning in place.
Once the roast is done, the rest of your coffee workflow folds around those warm, resting beans. You’ll let the batch cool and rest in the tray while you set up the grinder and prep a pour-over or pull a shot, then portion the batch into smaller containers for the day; a single morning roast often supplies several brews and a couple of sample bags to note for later.In practice that means you juggle a few short tasks during and after the roast — pulling a sample, labeling a jar, wiping the sampler — and you may glance at the data logger to compare runs. A simple timing sketch can definitely help you slot the roast into a coffee routine without much fuss:
- Preheat and setup while you prepare equipment
- Roast during which you attend briefly
- Cool and rest while you grind and brew
| Stage | Typical time (approx.) |
|---|---|
| Preheat & setup | Short, done while arranging gear |
| Active roast | Brief window you monitor closely |
| Cool/rest | Short pause before grinding and brewing |
how this half‑hot‑air drum roaster matches your expectations and where it reveals limits in everyday use

Batch rhythm and control feedback tend to align with common expectations for a hybrid drum/air roaster: visible sight glass and real‑time temperature readouts let operators follow color and temperature shifts without opening the drum, and the sampler spoon and burner window are regularly used during a roast to confirm progress. In everyday runs the machine settles into a predictable cadence — loading, heat buildup, active roast, then cooling — and that cadence, combined with the cooling tray and mixing motor, shapes how many batches get pushed through in a session. Routine interactions that appear repeatedly include:
- brief sampling and sighting through the glass during first and second crack
- adjusting hot‑air volume and drum speed based on visual and temp cues
- emptying chaff from the cooling tray after a string of batches
These moments are not elaborate maintenance steps so much as habitual touches that structure a roasting day.
Everyday limits show up in practical places: the footprint and single‑phase power requirement influence where the unit lives,and when runs stack up the optional smoke filter or room ventilation becomes evident as a non‑negotiable part of normal operation. Motorized controls provide fine adjustments, yet managing four separate actuators can feel like continuous attention during tight profiles, and small, routine cleaning of the drum opening, sight glass and cooling tray is a recurring presence rather than an occasional chore. theoretical hourly throughput is useful as a reference, but in real use the effective output tends to cluster toward the lower end of listed ranges once cooling time and short pauses for sampling are included.
| Observed running mode | Typical output (contextual) |
|---|---|
| Intermittent day sessions (with sampling) | around 4–5 kg/hr |
| Continuous runs (minimal interruptions) | approaching listed upper range in most cases |
Full specifications and configuration details can be viewed here.
How much bench space, ventilation and storage you’ll need to live with it
When setting the unit down, factor in more than just the footprint — it sits on roughly a one-meter by two‑thirds‑metre patch and rises to about eye level, so plan for both surface area and vertical clearance. Place it on a sturdy surface that won’t flex under intermittent vibration; the machine’s mass and the motion of the drum make wobble noticeable during a roast. Leave enough room in front for the cooling tray and sampler spoon to be used without obstructions, and allow access to the sight glass and burner window glass for quick visual checks. The original packaging dimensions are handy to keep if the roaster will be moved or stored temporarily, and the crate size gives a sense of the space you’ll need when stashing it away between uses. In normal daily interaction a small service gap behind the unit helps when you need to reach power and gas connections or pull a filter, and a side gap makes routine chaff removal easier — the table below gives typical clearances observed in everyday setups.
Ventilation tends to be the other visible constraint.With the smoke filter offered as an option, some setups quietly recirculate air while others route exhaust outdoors; either way the area should allow unimpeded airflow from the hot‑air outlet. A modest extraction point or an open window nearby frequently enough reduces lingering roast aromas, and a short run of ducting or a hood is commonly added where indoor ventilation is limited. Storage for consumables and small accessories usually ends up in a compact nearby cupboard or on a shelf: spare filter elements,the sampler spoon,a small data logger and the occasional tool for the four motor assemblies. Typical items kept close at hand include:
- Sampler spoon and small cleaning brush
- Filter cartridges or a chaff-collection tray
- Packet of green beans and a labeled storage container
| Area | everyday clearance (observational) |
|---|---|
| Front | space to open cooling tray and remove chaff — roughly 30–50 cm |
| Rear | Access for connections and slight ducting — around 10–30 cm |
| Above | Room to monitor sight glass and dissipate heat — about 40–60 cm |
Its place in Daily Routines
Over time you stop treating the stainless steel drum coffee roasters half hot air roasting machine manual 1kg coffee roast like an experiment and it slides into the background of mornings. It lives on the counter where its brushed surface gathers fingerprints and the occasional nick from a cooling tray, and you find small habits—checking the drum by eye, wiping the rim, pausing for a smell—becoming part of the rhythm. in regular household rhythms you notice the quiet timing of batches and how the kitchen rearranges itself around those moments,not grand gestures but steady,familiar movements. Eventually it simply settles into your routine and stays.
As an Amazon Associate I earn from qualifying purchases. Amazon and the Amazon logo are trademarks of Amazon.com, Inc, or its affiliates. All images belong to Amazon