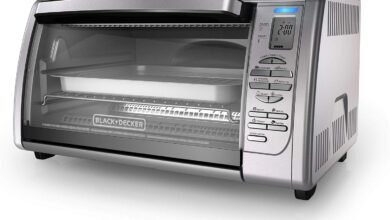
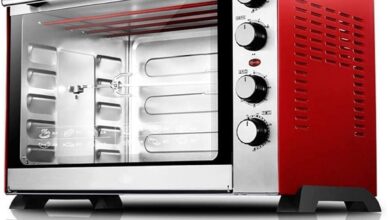
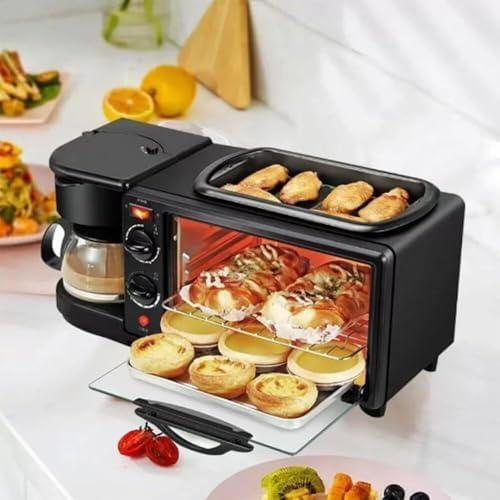
Your fingers first register the cool, brushed stainless steel as you lift the unit—modest heft, not cumbersome—and it settles with a quiet, deliberate balance on the counter. The front glass and single slot read cleanly in profile, and a speedy turn of the mechanical dial gives a soft, precise click before the timer begins its faint, metronomic tick. sliding the non-stick pan into place, the coating feels satin-smooth beneath your palm; the removable water reservoir slides free with a muted rattle. In the morning light the Breakfast Maker Station 3‑in‑1 Portable Oven with Coffee Machine (or,simply,the Breakfast Maker Station) registers as a compact,utilitarian presence—unobtrusive,tactile,and immediately familiar in use.
Your counter at dawn: how the 3‑in‑1 breakfast station looks when you reach for it
When you reach for it at dawn, the unit reads like a small, purposeful island on your counter. The stainless surface catches the pale kitchen light and the control face turns toward you — a row of knobs and a dial that invite a familiar twist. Steam and the scent of brewed coffee can still hang in the air, softening the edges of the appliance, and the fry‑pan handle or grill lip is often the first warm thing your hand finds. Small details stand out in the moment: a faint ring of crumbs in the drip area, a smear on the chrome edge, the way the cord tucks behind a coffee mug — ordinary traces of the previous morning that make the machine feel lived‑in rather than pristine.
There are a few habitual touchpoints you notice before anything else:
- The timer knob — your fingers go to it almost automatically.
- The coffee area — the filter or carafe shows whether there’s remaining warmth or a splash to wipe.
- the frying surface or tray — it frequently enough needs a quick glance before you start cooking.
In most cases you move things around: a cereal box slid aside, a mug set on top for a moment, a paper towel touched to a small spill.Cleaning shows up as part of that ritual rather than a chore — you lift and set down removable pieces, give the exterior a casual wipe, and stock the nearby shelf with whatever you’ll use next. The overall presence on your counter is functional and immediate; it fits into the quick, slightly messy rhythm of mornings where speed and small adjustments matter more than perfection.
When you pick it up: the materials, weight and how the non‑stick pan and oven finish feel in your hands
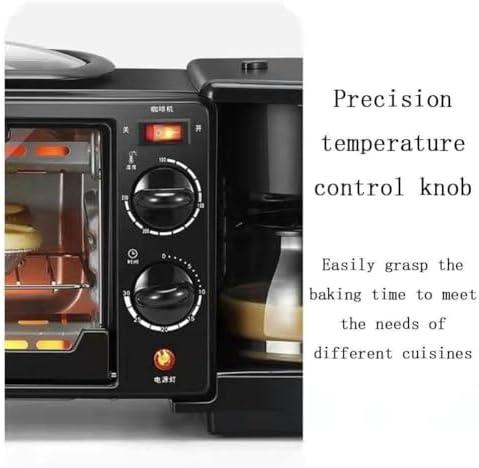
When you lift the unit you first notice the shell: a cool, brushed stainless steel surface that takes fingerprints but wipes off without fuss. at roughly 4 kg, it feels substantive rather than feather‑light — easy enough to shift around the countertop, but something you’ll normally carry with two hands for short moves. The weight settles low, so the base feels anchored as you lift; the top section and control knobs give a different tactile cue, with the dials offering a satisfyingly mechanical click. Small plastic touches (the handle and some trim) interrupt the metal with a softer grip, and the oven door pulls open with a smooth,slightly weighted motion that feels finished rather than flimsy.
Handling the removable non‑stick pan is a different, more delicate experience: it’s noticeably lighter than the oven body and the interior surface is slick under your fingers, so food slides off during routine use and the pan slips easily into and out of its slot. The pan’s edges provide just enough lip to pinch when you move it, though metal utensils can feel sharper against that coating, and you tend to pause and reposition when carrying it hot. Below is a short reference of what different contact points feel like in typical handling:
| contact point | Tactile impression |
|---|---|
| Outer case | Brushed, cool to touch at room temp; shows prints |
| Control knobs | Mechanical resistance, clicky feedback |
| Oven door/handle | Smooth, slightly weighted pull; plastic grip |
| Non‑stick pan | Slick interior, light to lift, defined lip for gripping |
Where it settles in your kitchen: footprint, height and how it fits beside your kettle and cupboards
When you place this on your counter it tends to settle as a compact, shallow unit rather than a tall tower. As it only projects a short distance forward, it usually fits beside a kettle without pushing you to the edge of the worktop; the nominal measurements are useful here as a quick check when you’re measuring a gap. At around 4 kg it’s light enough to nudge or lift for a quick rearrange, but you’ll notice that having a little extra space above and in front makes everyday use easier — especially where overhead cupboards sit low or the kettle and other small appliances already crowd the surface.
In practise you’ll want a small amount of breathing room for routine interactions: the front needs to open freely, the side or top should be reachable for filling and wiping, and a nearby socket and its plug need clearance.A few simple observations that help when you move it into place:
- door swing — leave room in front so the opening isn’t blocked
- Tank and tray access — allow side/front reach for removing and replacing parts
- Power lead — consider plug direction so the cord doesn’t force the unit away from the wall
| Typical counter space taken | Context |
|---|---|
| Shallow footprint | Fits well on most standard counters without extending past the kettle |
| Low height | Usually clears lower cupboards but a few centimetres of top clearance keeps access comfortable |
You’ll also find it becomes part of your wiping and tidying routine — crumbs and splashes collect in the small gap between appliances, so occasional lifts or sideways nudges are common in everyday use.
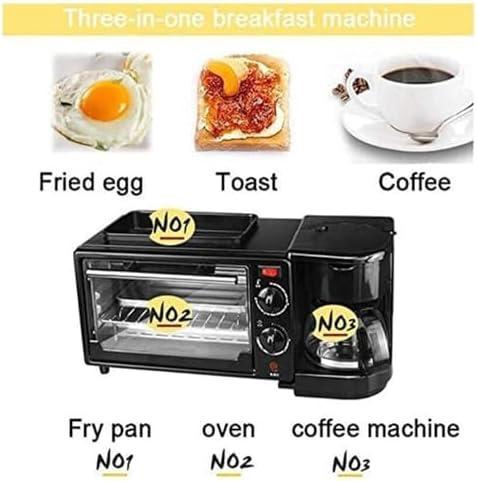
A real morning in motion: how you move between the oven, pan and coffee maker during a 20‑minute breakfast
You begin the 20‑minute stretch by setting the coffee maker going and turning your attention to the pan and oven in quick succession. The first few minutes are spent moving with purpose: you slide the oven door open to position a tray,then step back to stir eggs in the pan,reach for tongs,and glance at the coffee carafe as it drips. Your motions are a short loop — forward to the oven, pivot to the stovetop, lean over the coffee brewer — punctuated by small pauses to wipe a splatter, adjust a knob, or swap spatulas. At moments you find yourself holding two tasks in mind: a quick flip in the pan that can’t be left unattended, and the oven door that needs a brief nudge to check browning; the brewing cycle of the coffee quietly occupies a stretch of hands-off time while you handle the more active pieces.
That rhythm tends to settle into a few repeatable checkpoints during those twenty minutes, and they usually look like this as you move through the routine:
- Early minutes: start the coffee and get eggs or batter in the pan while the oven preheats or begins its short bake.
- Mid window: flip or stir at the pan, open the oven briefly to rotate or check items, and lift the coffee carafe to monitor volume and aroma.
- Final stretch: pull the tray, plate the pan food, and reach for the coffee to pour and keep-warm as last bits finish in the oven.
Throughout you leave small traces of upkeep — a quick scrape of the pan lip, a towel under a drip tray, a used filter set aside — gestures that integrate into the flow rather than interrupt it. These habitual moves shape how you physically occupy the counter: short pivots, a couple of deliberate reaches, and the occasional pause to let a surface cool before handling.
How the station matches what you expect from a 3‑in‑1 and the everyday limits you encounter

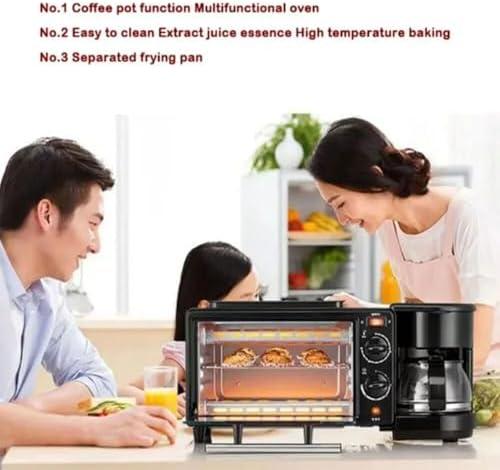
In everyday use the station behaves like a compact, combined breakfast workflow rather than three wholly autonomous machines. Brewing, toasting and pan-cooking can run in overlapping sequences: the coffee brewer will cycle while the oven heats, and the fry pan reaches cooking temperature quickly enough to brown eggs or bacon during a single timer run. The controls tend to encourage simple, sequential steps rather than complex multitasking—knobs and a mechanical timer make it easy to start each function, but users often watch progress and stagger items to keep everything finishing at the same moment. Simultaneous tasks are achievable for quick, small portions, and the keep‑warm and non‑stick surfaces show up as practical conveniences during a rushed morning routine.
The everyday limits become apparent as small,habitual frictions rather than outright failures. Common pinch points include:
- Capacity constraints that require smaller portions or multiple batches, especially for oven dishes or when more than a couple of servings are needed
- Single‑slot and compact interior space that make larger breads, full casseroles, or big pans impractical
- Short timer range and manual controls that mean clock‑watching or resetting for longer bakes
- Small water reservoir and filter handling that lead to more frequent refills and occasional spills when topping up
Routine upkeep shows up as part of the rhythm—removable pieces and wipeable surfaces simplify tidying, but the need to clean trays and the pan after everyday use is a regular, expected step. View full product specifications and listing details
Cleaning and stashing it away: how you’re likely to maintain and store the unit day to day
After a morning run-through you’ll typically treat this as a countertop habit: wipe the exterior and glass door with a damp cloth, pull out the tray and grill to toss crumbs, and rinse the coffee water tank and filter basket before leaving the unit to air. The removable frying pan and baking tray tend to be the parts you handle most frequently enough; in many routines those pieces go into the dishwasher or are scrubbed quickly by hand, while the interior cavity usually gets a quick wipe to lift splatters. You’ll notice the stainless-steel finish shows fingerprints, so a light swipe becomes part of the post-use rhythm rather than a special chore.
When it’s time to stash the appliance away you’ll follow a casual pattern: dry the removable parts and often nest them inside the oven compartment, wrap the cord loosely and slide the unit into a cupboard or along a counter corner. For easy reference, the table below summarizes how the most-touched components tend to fit into a weekly or daily upkeep loop—an observational snapshot rather than a checklist.
- Tray & grill — removed and refreshed most days
- Non-stick pan — wiped or rinsed after use
- Water tank & filter — rinsed and left to air
| Component | Typical timing you’ll do it |
|---|---|
| Crumb tray/interior wipe | Daily or after any crumb-heavy use |
| Removable pans/trays | Daily or placed in dishwasher when convenient |
How it Settles Into Regular Use
Living with the Breakfast Maker Station 3-in-1 Portable Oven with Coffee Machine Non-stick Pan Toaster Oven 30-Min Timer,it becomes a quiet presence in morning routines over time rather than a focal point. it sits on the counter, nudging other items slightly as habits form around its footprint, surfaces gaining faint marks and the pan’s finish mellowing as its used. In daily routines,the small sequence of lights,the click of the timer and the smell of toast fold into regular household rhythms,handled with the same brief gestures each day. Over time it settles into routine.
As an Amazon Associate I earn from qualifying purchases. Amazon and the Amazon logo are trademarks of Amazon.com, Inc, or its affiliates. All images belong to Amazon