Under your hand the sheet metal feels cool and slightly grainy, noticeably heavier than the ceiling tiles it will sit beside.The KwiKool CK-12S Optional Ceiling Duct kit for KPAC1411-2 and KPAC1811-2 — I’ll refer to it simply as the duct kit — arrives as a flat, shallow assembly that reads more like a tile than a ductwork add-on. From below it registers as a narrow grille set almost flush with the grid; the edges are crisp and the finish has a utilitarian, no-frills look. You hear a soft clink when it meets the tile frame, and once air moves through it the room notices a quiet whoosh rather than anything harsh, making its presence more tactile and audible than visually dramatic.
What the kwikool CK-12S looks like when you glance up at your ceiling
When you glance up at the ceiling the installation reads more like a practical interruption than a decorative element: the tile around the opening is visibly cut, the duct collar pushes through with a thin metal lip, and the metal flange sits against the grid so that the whole assembly lines up with the drop-ceiling squares. There’s a small printed line you can usually catch from below: “Ceiling Tile and Duct Kit Used for removing hot exhaust when using units in rooms with drop ceilings.
“isProductSummaryAvailable”:false,”device”:”desktop” made in US › See more product details” — the sticker and faint tooling marks are easy to spot if the lighting hits at an angle, and from your usual standing position the edges and seams are what register first.
At a glance you notice a few recurring visual cues that become part of the room’s routine appearance:
- Cut tile edge: the trimmed fiber or mineral tile shows a slightly rough texture where it was removed.
- Metal collar and flange: a thin band of metal interrupts the tile pattern and catches light differently.
- Grid alignment: the kit sits within the metal T-grid so the opening reads as an added fixture rather than a hole.
Dust and faint scuffing tend to collect along the lip over time, and when you reach up to shift a tile during a ceiling check you can feel how the piece is seated — not locked-in looking, but neatly integrated into the ceiling plane.
How the kit’s components feel in your hands and the materials you’ll handle during unpacking
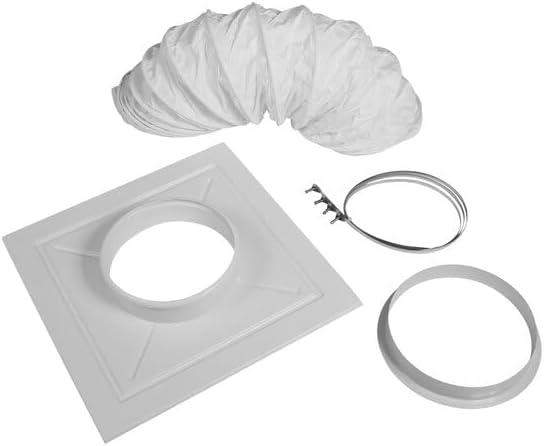
When you open the box, the first impressions are tactile: thin cardboard, a few plastic bags, and pieces nested with paper or thin foam. The ceiling tile insert feels like a lightweight composite board — not fragile,but with a slightly fibrous face that gives when you press the edge; the cutout edge where the duct sits is clean but can show minor fluffing if you rub it. metal parts come wrapped or capped in small bags; the duct collar itself is cool and smooth to the touch, with the characteristic stiffness of stamped sheet metal and lightly rolled edges where seams meet. Smaller hardware lives in one or two clear bags: a handful of screws, a foam gasket strip, and a spring clamp. You’ll notice the foam gasket is soft and a bit tacky, the screws are typical zinc-plated metals with crisp threads, and any plastic clips have a firm snap when you flex them. You’ll also find a small information slip that repeats the kit’s purpose — “Ceiling Tile and Duct Kit Used for removing hot exhaust when using units in rooms with drop ceilings.” — and a short label noting “Made in US.”
Handling the pieces together tends to feel like a sequence of different textures: the tile has that matte, dust-prone surface while the metal components are smooth and slightly cold, and the rubbery gasket wants a bit of fiddling to seat properly. If you carry assembled subcomponents, the join between tile and collar can feel rigid where the sheet metal bites into the board, and the whole assembly shifts weight subtly as you reorient it. A fast reference table below summarizes the main tactile cues you’ll encounter during unpacking and first handling.
| Component | How it feels in your hands |
|---|---|
| Ceiling tile insert | Light, fibrous face; matte surface that picks up small dust and squeezes slightly at edges |
| Duct collar (sheet metal) | Cool, stiff, smooth with rolled seams; slight give at thin sections |
| Foam gasket & tape | Soft, slightly tacky; compresses easily when pressed |
| Hardware bag | Small, crisp metal screws and a few plastic clips that snap when flexed |
how it occupies the space above a typical ceiling panel and the dimensions you’ll notice
When you lift a ceiling panel to check the kit in place, the first thing you notice is how the collar and short ducting sit right in the tile opening — the metal flange tends to rest against the tile edge and the T-bar grid.The main body of the ducting lies flat against the plenum ceiling, so most of the visible change is around the opening rather than a bulky mass hanging down. You’ll find yourself nudging a bit of insulation or a stray cable out of the way more often than wrestling with the unit itself; in everyday use the surrounding tiles sit back into the grid with a small, perceptible lift where the collar overlaps the panel. Handling tiles to access the connection becomes a routine task that can feel a little fiddly at first, and you’ll notice some dust build-up on the exposed flange over time that you clean as part of normal maintenance.
In terms of the dimensions you’ll notice while installing or peeking above a typical ceiling panel, the kit occupies a shallow footprint across the tile opening and then extends laterally into the plenum for the flexible hose and elbow. A few contextual reference points you’ll observe: the collar projects a couple of inches into the room when the tile is in place,the flexible hose needs some lateral room to bend without kinking,and the mounting hardware sits close to the T-bar so it can feel snug around other ceiling fixtures. A quick visual guide:
| Component | Typical space used (approx.) |
|---|---|
| Collar projection from tile | ~2–3 inches into the tile opening |
| Flexible hose reach into plenum | ~10–18 inches of lateral space to avoid tight bends |
| clearance above panel for fittings | several inches of vertical plenum space |
- Collar placement: sits within the tile cutout and sits against the grid.
- Hose routing: needs gentle curves rather than sharp turns.
- Tile handling: you’ll lift and reseat panels more than once while adjusting alignment.
What positioning and fastening feel like when you install the duct kit alongside your KPAC unit
When you lift the duct kit into the ceiling space and line it up with the KPAC unit,the first sensations are mostly about balance and small adjustments. The drop ceiling tiles give a soft, springy resistance as you push them aside and nudge the duct collar into place; once the collar meets the unit flange there’s a firmer, metallic contact that you can feel under your palms. Aligning the kit is often a sequence of tiny shifts — slide a bracket, rotate the duct a degree or two, then feel for the flush contact — rather than one smooth motion. Around the edges you’ll notice three distinct tactile cues that help confirm positioning:
- tile frame — a yielding support that settles when the weight is right
- metal collar — a solid stop where the duct meets the unit
- screw holes/flanges — small points that require precise lining up
Ceiling Tile and Duct Kit Used for removing hot exhaust when using units in rooms with drop ceilings. Made in US › See more product details
Fastening the pieces tends to feel incremental: you hold things steady with one hand while the other drives screws or snaps clips into place, and there’s a noticeable change in feedback as each connection bites and tightens. Screws give a gradual resistance and a slight vibration through the tool or driver as the threads engage; clips or spring fasteners make a short, decisive click when they seat. If something isn’t aligned correctly you’ll often sense a subtle wobble or a misfit under light pressure — tightening won’t eliminate that feeling, it only locks whatever alignment is present.A small table below summarizes where those sensations typically appear during the process:
| Fastening point | What it feels like |
|---|---|
| Duct-to-unit flange | Firm metal-to-metal contact, then steady resistance as fastener engages |
| bracket to ceiling grid | Initially soft support from tile, then a clearer stop once seated |
How the CK-12S measures up to your expectations and the real-life limits it reveals for your setup
Ceiling Tile and Duct Kit Used for removing hot exhaust when using units in rooms with drop ceilings.
“isProductSummaryAvailable”:false,”device”:”desktop” Made in US › See more product details.in everyday use the kit generally performs the single job it was brought in for: creating a discreet path through a drop ceiling so hot exhaust leaves the room rather than pooling above the tiles. What becomes apparent quickly is less about raw capability and more about the room’s ceiling anatomy — things like how deep the plenum is, where light fixtures and cross-bracing sit, and weather the nearest tile will accept a collar without awkward trimming. Installers tend to make small,on‑the‑fly adjustments during placement,and the component sits in the ceiling as a routine object to glance at during seasonal checks rather than something that demands constant attention.
Observed constraints show up as practical, not technical, limits. Common constraints include tight clearance above tiles that can make routing feel cramped, the need to temporarily remove a tile for access when tweaking alignment, and dust buildup at the collar that ends up being part of normal upkeep.Thes behaviors tend to expose the ceiling grid’s quirks — offset joists, recessed fixtures, and variable tile thickness — more than they reveal flaws in the kit itself. Complete specifications and current listing details can be viewed here.
Everyday patterns you’ll observe after installation — access points, adjustments and routine visibility
Once the kit is in place you’ll notice a few repeating visual cues as part of the room’s everyday backdrop.The most obvious are the small differences where the tile meets the duct collar: a hairline gap, a slightly darker seam, a pair of screw heads tucked near the cutout. Access points tend to present themselves in the same three spots each time you check — the tile edge you lift, the collar around the vent, and any little service plate that sits flush with the grid — and those are the places you find yourself returning to when you make routine adjustments or quick inspections. You’ll also get used to the sound and feel: a faint warmth when you lean up to the ceiling, a soft airflow trace you can sometimes feel on the back of your hand, and the way a slightly misaligned tile throws a narrow shadow under certain lights.
In daily use you’ll perform small, habitual interactions rather than major changes — nudging a tile back into line, reseating the collar, or brushing dust from the exposed rim during a room clean. These actions are occasional and quick; the assembly or else sits out of sight, with only a narrow seam or grille showing. The table below maps typical visibility cues to how often you’re likely to notice them in ordinary use, so you can picture where your attention will drift during routine checks.
ceiling Tile and Duct Kit Used for removing hot exhaust when using units in rooms with drop ceilings.
“isProductSummaryAvailable”:false,”device”:”desktop” Made in US › See more product details
| Visible cue | How often you’ll notice it |
|---|---|
| Tile edge/cutout seam | During routine cleaning or when replacing a tile |
| Collar and fasteners | When you need to realign or check the seal |
How It Settles Into Regular Use
You find it less remarkable over time; after the initial fuss of fitting, the KwiKool CK-12S Optional Ceiling Duct kit for KPAC1411-2 and KPAC1811-2 simply occupies its place overhead. In daily routines it becomes a steady,quiet presence,catching the odd smudge or line of dust along edges as it’s used and glanced at between other tasks. Movements, cleaning habits and light shift around that overhead plane without much thought, familiarity growing in small, unremarked ways. In time it settles into routine.
As an Amazon Associate I earn from qualifying purchases. Amazon and the Amazon logo are trademarks of Amazon.com, Inc, or its affiliates. All images belong to Amazon